Bowtie Risk Analysis Explained for Process & Personal Safety

A bowtie diagram is a visual risk management tool that identifies threats, preventive controls, consequences, and recovery measures associated with a defined hazard or top event. It is widely used in high-hazard industries to support major hazard management and demonstrate that risks have been reduced to ALARP.
Key takeaways
- A bowtie diagram visually links hazards, threats, controls, consequences, and recovery measures.
- Bowties support ALARP demonstrations by showing how risks are reduced to a defensible level.
- Every threat must have at least one preventive control, and every consequence must have a recovery measure.
- Escalation factors and HSE critical tasks help manage barrier reliability.
What is a bowtie diagram in risk management?
A bowtie diagram is a visual risk management tool used to identify threats, preventive controls, consequences, and recovery measures associated with a specific hazard or “top event.” In high-hazard industries such as refining and petrochemicals, bowtie analysis is widely used to support major hazard management and demonstrate that risks have been minimized.
And yes, it’s called a “bowtie” because, visually, it looks like one. We like to say that using this type of analysis helps you wrap up your risk management with a bow(tie)! But beyond the clever shape, bowties are a super-effective risk management tool because they:
- Facilitate group discussions necessary for brainstorming and refinement of the full risk management “picture”
- Support defensible ALARP (As Low As Reasonably Possible) demonstrations
- Focus presentations to stakeholders, leadership, and regulators for feedback and approval
- Convey how you will manage risk in succinct and easily digestible fashion. As the saying goes, “A picture is worth a thousand words!”
How do bowties support ALARP demonstration?
Bowties provide a systematic approach to risk management, enabling risk reduction to ALARP (As Low As Reasonably Practicable) and demonstration of such. ALARP involves reducing risk to a level at which the cost and effort (time and trouble) of further risk reduction is grossly disproportionate to the risk reduction achieved.
How does a bowtie work?
Figure 1 illustrates the logic of a bowtie diagram from left to right. Think of it as a story of risk:
- What could cause a loss of control? (Threats)
- What stops it? (Preventive Barriers/Controls)
- What happens if it does occur? (Consequences)
- How do we prevent/reduce the impact? (Recovery Preparedness Measures)
By visually connecting these elements, the bowtie makes risk pathways explicit and highlights exactly where barriers must perform: every threat must have one or more control measures, and every consequence must have one or more recovery preparedness measures.
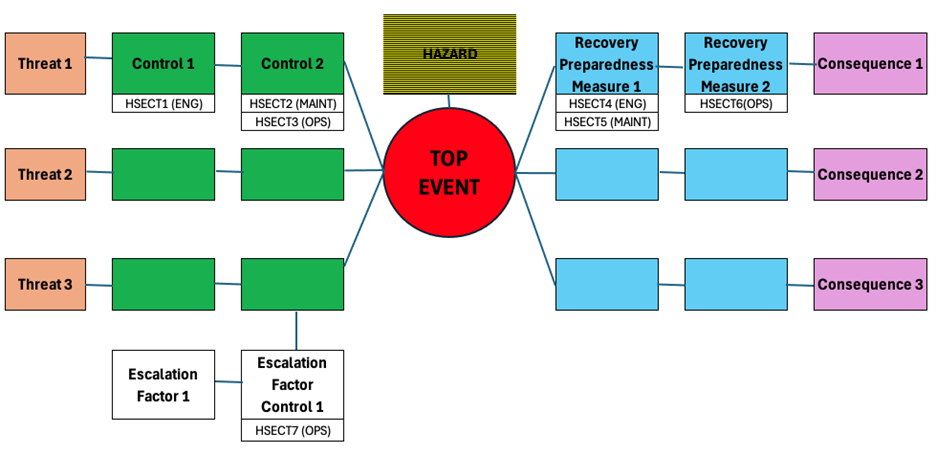
Figure 1: Anatomy of a bowtie diagram
Key elements of a bowtie diagram
Understanding each element of a bowtie diagram is critical to using it effectively.
Left-hand side: Prevention
- Threat: A cause leading to the release or loss of control of the hazard (e.g., toxic gas) through the top event (e.g., Loss of Process Containment or LOPC)
- Control: A barrier that can prevent a particular threat from resulting in the release of the hazard through the top event
Right-hand side: Mitigation
- Recovery Preparedness Measure: A barrier that prevents, mitigates, or helps recover from the associated consequence
- Consequence: An undesirable outcome or condition, typically of a HSE, financial, or reputational nature (e.g., fatality, asset damage, or adverse media attention)
Both sides: Barrier management elements
- Escalation Factor: A cause for a given control or RPM to fail
- HSE Critical Task (HSECT): A task (typically engineering, maintenance, or operations in nature) that helps ensure the effectiveness of the control or RPM
Common applications of bowtie analysis
Bowtie diagrams can be used to manage just about any type of risk. Table 1 highlights some common application types and examples commonly found in a hazardous industrial facility.
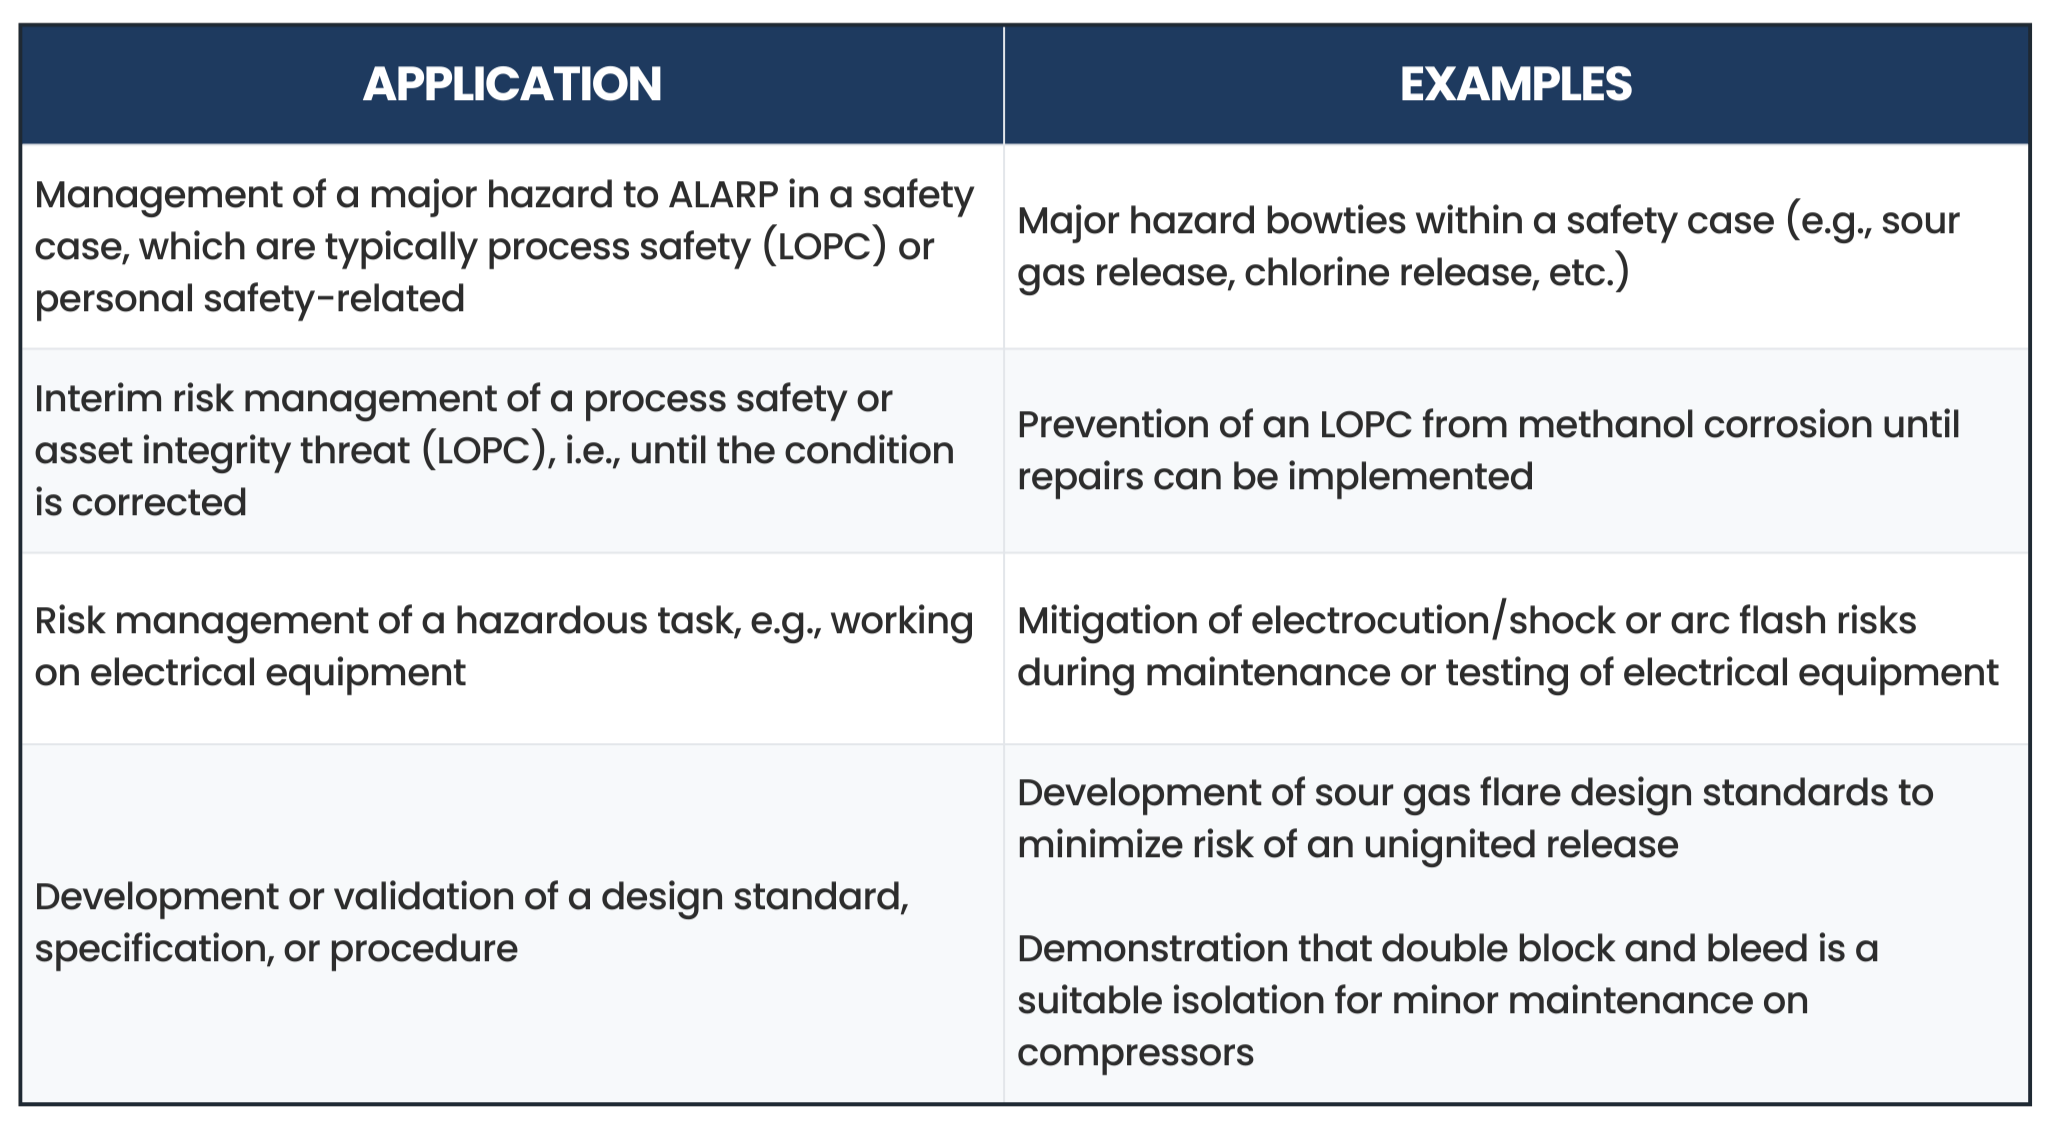
Table 1: Common applications of bowtie analysis in hazardous industrial facilities
Finding support for bowtie risk analysis
Becht’s Process Safety Management (PSM) consultants have experience developing hundreds of real-world bowtie diagrams across refineries, petrochemical facilities, and other high-hazard industrial operations. We can provide:
- Bowtie application support: Advice on whether a bowtie would be a suitable tool for a specific application
- Bowtie facilitation: Expert support in preparing, facilitating, and presenting bowties for your organization. In simple cases, this can be done remotely.
- Bowtie training: A hands-on training course that dissects an industrial disaster and demonstrates how it could have been prevented through the application of bowties. This training can also be customized to suit the client’s needs, including bowtie facilitation for a client-specific application
- Bowtie coaching: Ongoing support for in-house practitioners who want to strengthen internal bowtie capability after completing the Becht bowtie training course
If you’d like more information on bowtie applications, facilitation, training, or coaching, please don’t hesitate to reach out to us.
Like what you just read? Join our email list for more expert insights and industry updates.